Disclosure: The videos I use as examples are not necessarily endorsements for the individuals or companies. I may not 100% agree with everything in them and that’s okay. They were most likely chosen because they are concise and the videography makes the overall concepts easier to understand. CQB is a very nuanced subject with many opinions, and instead of getting bogged down by every detail it’s important to get a bird’s eye view of it first.
Now that we have examined the origins and contexts of CQB, it’s time to discuss the actual tactics. The purpose of this post is to focus on fundamentals like room geometry and using angles to your advantage. Not every detail like footwork, hip orientation, back lighting, or breaching methods, for example, will be included. This is not because they are unimportant. There are simply some things that must be demonstrated and explained in person. Additionally, there are varying SOP’s depending on unit and organization. Think of this post as more of a high-level primer.
The very first step to CQB is determining which type one must perform. Put simply, are you alone or in a group? As mentioned previously (please read first before proceeding), CQB is inherently dangerous. The best way to mitigate risk is having an organized team with more eyes and more firepower on an objective. Recognizing this, I think learning it as a team first will reinforce the complexities of the topic and provides a higher level of understanding than someone who only knows single-person tactics. With that said, we are going to break down performing team CQB at a basic level, devoid of all the idiosyncrasies that armchair commandos argue about online. The goal here is to understand how it works conceptually.
Next, you will need to figure out if you are performing dynamic or deliberate CQB. What is the difference between to the two? Dynamic entry is what most are used to seeing in movies. It is used when the enemy knows you are there, so the focus is going into the room as fast and violently as possible. As said before in CQB In Context, losing the element of surprise in CQB makes it incredibly dangerous and not worth performing most of the time. There are few scenarios that justify dynamic entry. It would make sense in hostage rescue where time is of the essence and operator safety is not the top priority. If your team receives heavy contact moving down a hall and needs to get out of the way quickly by darting into another room, then it would also make sense in that situation.
Deliberate entry is just the way it sounds. It is a slower, methodical approach taken when you are maintaining the element of surprise. Doorways can be pied to clear 90% of the room before making entry and minimizing exposure is the top priority. Thankfully, this is what a lot of modern CQB has evolved into, although sometimes a blend between dynamic and deliberate CQB is required in certain situations.
After figuring that out, you need to determine what you are clearing. There a few basic layouts inside most structures. They are as follows: corner-fed rooms, center-fed rooms, hallways (L, T, and intersections), and staircases. There are obviously exceptions to this, but mastering these first will help you solve more complex problems. Think of this like learning math. It would be hard to solve a problem or learn a formula without knowing basic arithmetic principles.
Before we begin, there are some basic rules that must always be followed. They pertain to the number one man, determining angles of approach, muzzle orientation, and proximity to teammates.
First, the number one man is never wrong, even if he is. Simply go the opposite direction he does when entering. Fill and flow into the room. Don’t get caught in the minutiae of techniques over the execution. The last thing you want to do is hesitate in a doorway and get everyone killed in the fatal funnel.
Second, the way doors open determines the entry angle. The way many units teach it is by focusing where hinges and door knobs are, which is a great start, but sometimes your approach angle or the structure will not accommodate rigid doctrine. When in doubt, open the door in a way that best conceals your position and minimizes your exposure given the circumstance.
Third, your muzzle must always be ready be ready to work when clearing structures. In an environment where fractions of seconds count, your muzzle should not be in a low ready position when going through a doorway to an uncleared room. If someone says, “What if it needs to be to avoid flagging teammates upon entry?” then they are making entry wrong. Every muzzle entering that room must be capable of engaging threats immediately and that is possible if the team is well-trained. By the way, this is not an argument of Army versus Navy between high port or low ready. Both work when used properly.
Lastly, entry teams need to stay close together when crossing thresholds. The first man will get killed almost immediately if the rest of the team enters a second too late. The more eyes and weapons you can get into a room simultaneously, the better. This helps ensure the target gets overwhelmed by the amount of firepower and will have a harder time determining which people to shoot first. With all of that said, let’s start by breaking down structural layouts and clearing them as a team.
Corner-fed rooms are easiest to clear, and thankfully they are the most common in architectural plans. These are great because they can be mostly cleared from the outside with little dead space remaining before entering. If circumstances allow, the number one man can pie the doorway and then make entry, favoring a more deliberate technique.
Center-fed rooms are difficult because you must deal with two sides at once, leaving you more vulnerable. The number one man must choose between button-hooking or going straight. The layout of the room, obstacles, and threat awareness (hearing stimuli like enemy footsteps or breathing) will determine how he will decide between the two options. It goes without saying that the number two man must enter simultaneously, going the opposite direction to cover the number one man.
As a side note, I would like to address something that many seem to misunderstand. Dogma is second to adaptability. If the number one man enters a room and sees an enemy, he does not simply ignore him because he is not in his corner area of responsibility. The number one man will engage him while continuing to move into his designated area. Some do not agree with this since there could be a tendency to get target fixation and stop in the doorway, potentially leading everyone in the stack to get killed. This is why you see the institutionally inbred (Pat Mcnamara term) method of the number one man digging into his corners first, relying on the number two man to kill the enemy in his specified area of responsibility. Every situation is different, but generally speaking, I disagree with this. Train your team to higher levels of proficiency so they can task process and shoot on the move better versus settling for mediocrity. Just because a technique may be harder to learn does not mean it is useless. Watering down dogma so its easier to perform versus becoming more lethal is the same DOD check-the-box logic that has gotten so many killed. If a technique enables you to kill the enemy faster, then it’s correct.
Like doorways, hallways are called fatal funnels for a reason. There is only one direction for incoming rounds to go. They should always be treated as transitory areas of a building that are a necessary evil. Hallways are not a place to stay for extended periods of time while a structure is being cleared. The two golden rules for clearing hallways are to make sure people are looking for work and that spacing is maintained.
What does ‘looking for work’ mean? It means someone always has eyes on uncleared sections inside the hallway. This translates to every man always having eyes and at least one muzzle directed toward uncleared portions of the hall, which is an obvious concept. Where people can get into trouble is their number four or five man (whoever is in the back of the stack) getting complacent. Because that position is less intense when entering a room, people tend to get a bit more relaxed, sometimes forgetting the importance of their position. The reality is, two to three men can clear a room 99% of the time, making the number four man less important inside it. Sometimes a fourth man helping clear is required if a room is large (think warehouses) but it’s rare.
The most important role for number four is maintaining security down that hallway when the rest of the team is clearing the room, periodically checking the rear flank if the structure flows all the way around and there is no rear security element. This means that once the team has entered and cleared the room that number four is inside that doorway with his eyes and muzzle directed down that hall to maintain security. In non-LE contexts (think MIL or SHTF), the number four man is your AR (automatic rifleman) or closest equivalent, since his weapon is less wieldy for clearing rooms but possesses the capability to deliver a lot of hate down that hallway to overwhelm even multiple enemies if needed. The best cover in an area absent of cover is fire superiority and suppression to prevent the enemy from shooting back effectively, provided collateral damage is not a concern.
Having an AR-esque position as the number four man does affect the flow because his weapon is suboptimal for making entry first. The team cannot simply restack behind him and continue moving through the structure. In essence, the team must reorganize back into their designated positions after every room versus seamlessly flowing through a structure, making the number four man the number one man, eventually having everyone cycle through each position if the structure has enough rooms. To some, this doesn’t matter since they must do this to ensure the team leader (most experienced) is in the number two spot to lead anyway. To the more experienced or groups hyper focused on counter terrorism, this is a deal breaker because it them down and time is precious. You will need to determine if the capabilities that position brings to the whole mission is worth the inconvenience inside structures.
Spacing is another important factor to consider when moving down hallways. Unlike battle drills that are focused on wide open terrain, your fireteam is not as concerned about bunching up together since there’s only so much space that can be maintained between each other inside a hall. The real concern pertains to walls. You should never be touching them when moving down hallways. The first reason is to avoid giving away your position. An enemy hiding inside a room can hear you scraping against a wall (even just barely) or bumping into it at worst, allowing them to just shoot through the walls to get you. The second reason is because bullets tend hug walls. Stray rounds tend to ride walls closer than most think and don’t have extreme ricochet angles.
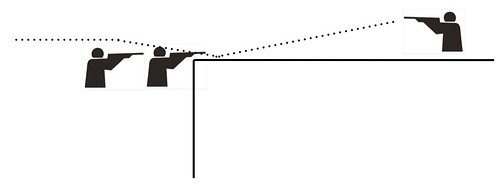
You don’t necessarily need to be in the middle of the hall because you may need to favor an opposite side to get a wider approach angle into a room or at an intersection. You just need to maintain roughly a one-foot offset from walls to avoid catching ricochets, should someone start firing directly down the hallway or, if they are more experienced, from inside another doorway shooting down the hallway at a tighter angle.

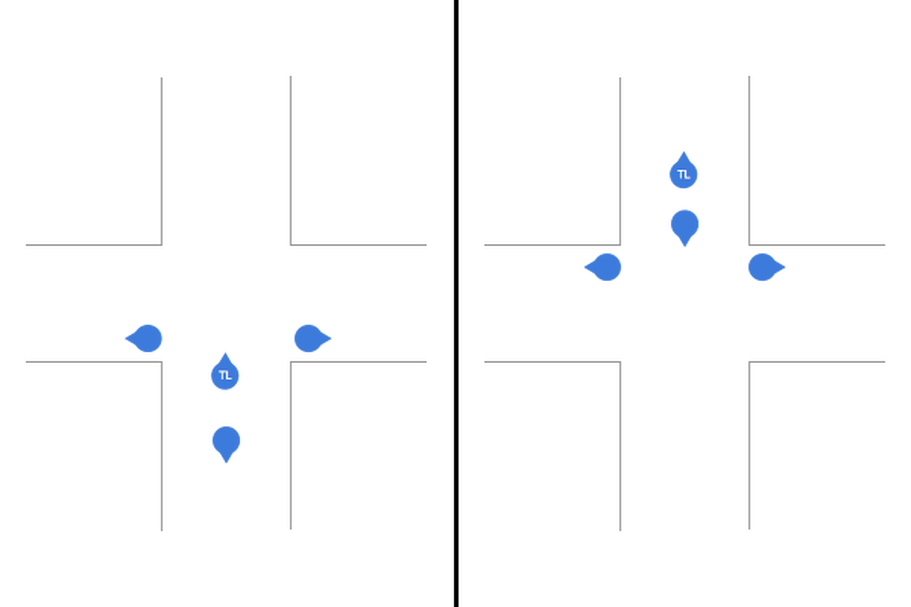
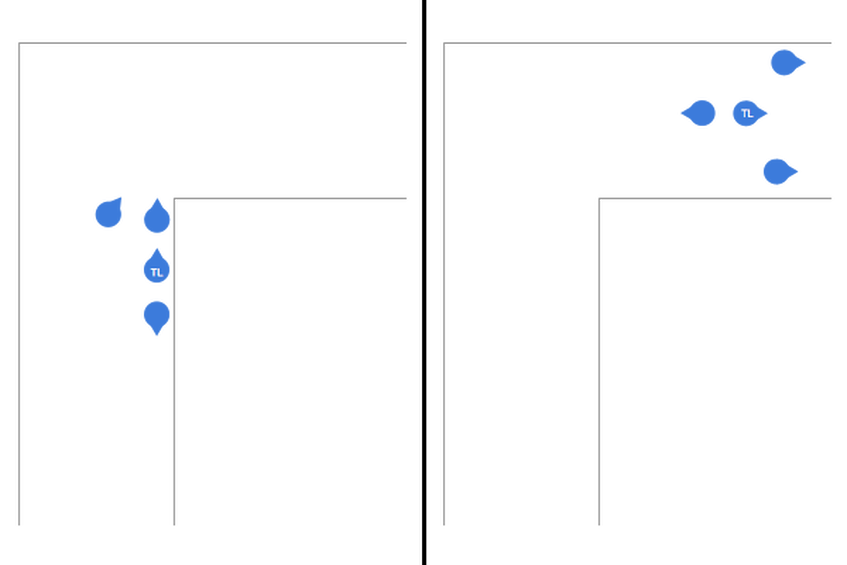
The Rolling T is probably the best way to move down a long hallway as a team. There are a few very important benefits. It enhances team leader control much better than being bunched in a file so they can see what everyone is doing. It also disperses the team at least slightly versus having everyone lined up behind each other for someone to easily gun them down. Everyone can use their weapon without committing fratricide, meaning more weapons can get into the fight and greater fields of fire are achieved to create better coverage. The rear flank can also be covered.
If needed, it easily lets the formation pivot if the team needs to look around a corner or address an intersection as shown below.
Finally, let’s talk about stairs. I have the same opinion as that of the crusty legend, Clint Smith. There is no great way to clear staircases and stairwells. All you can do is keep your head on swivel and collapse planes as they present themselves to you. It’s one of the few times where your muzzle may be oriented in a different direction than your eyes because you’re trying to cover multiple areas at once. Clearing stairs in teams obviously helps, but it doesn’t negate the fact it’s the most dangerous area of any structure. CQB is bad enough and stairs make it that much worse. This idea is kind of hard to understand in the abstract until you have tried clearing stairs against an opponent. Your understanding really solidifies once you’ve played OPFOR and had the privilege of camping on the high ground of some stairs.
Like clearing stairs, CQB, in general, truly is something that is not fully understood until you have performed it. The interaction with structural angles, working as a team, learning how others make decisions, and dealing with psychological stressors – they do not manifest themselves in the abstract. It must be rehearsed ad nauseam and learned in person. In saying that, now that you have a better idea of why (the most important factor) and a high level of how to perform CQB, I highly recommend getting trained by others who are experienced in it. While it can be hard to vet some outfits, a great way to filter the bullshit – as with most things – is subscribing to Occam’s Razor. There is almost always an inverse relationship between complexity and usefulness in this subject.
This is the second to last post for CQB. The last one will focus on the coveted single-person CQB, which is something very niche but valuable to know should you find yourself in the unlikely situation that warrants it. Because it takes a focused effort and is a nuanced subject, it may be a while before you see it on the next write-up. So, I hope you have enjoyed the journey into CQB so far. Stay tuned for the finale.

2 thoughts on “The Basics of Team CQB”